

Today I am going to explain the process of installing Sitecore on Docker. To get started with Sitecore on Docker you need to have some of the prerequisites already been set up on your desktop.
Prerequisites
- Windows 10 Professional or Enterprise version 1903 or later
- Enabled Hyper-V
- Minimum of 16 GB of RAM
- Sitecore license file
- Docker Desktop
Steps for installing Sitecore on Docker
1. First Step is to install Docker Desktop in your Windows. After installing Docker Desktop switch your Docker Desktop to Windows Container.

It is an important step to be followed else you will not able to install Sitecore on Docker.
2. Now you have to bypass some of the common issues by setting DNS server in Docker Engine. You have to go to Docker Desktop and select Settings and then Docker Engine.

3. Now you have to configure the Docker daemon by updating the JSON in Docker Engine. It's important to set the "dns" key to ["8.8.8.8"]. 8.8.8.8 is the primary DNS server for Google DNS.

4. After setting up the Docker Engine according to the image provided above. Click Apply and Restart.

5. Now download the Container Deployment Package (link provided at the end).

6. Now extract the package at your desired location and go to path \compose\ltsc2019\xp0. You can see some folders and files in it.

7. Now to avoid any conflict you must ensure that the ports (443, 8079, 8984, 14330) are not being used by any other process. If they are being used then you can update the docker-compose.yml file to use different ports or you can free these ports.

8. If your ports are not used by other processes or you have changed ports in docker-compose.yml then stop your IIS by using the command iisreset /stop in PowerShell.

9. If you want to change the password for SQL Sa password or Sitecore admin password then go to path \compose\ltsc2019\xp0\compose-init.ps1 and edit the password.

It is not a necessary step if you want to use the default password (Password12345).
10. Now run Windows PowerShell as an admin at the path \compose\ltsc2019\xp0. Now execute the below command to bypass the execution policies.
Set-ExecutionPolicy -Scope Process -ExecutionPolicy Bypass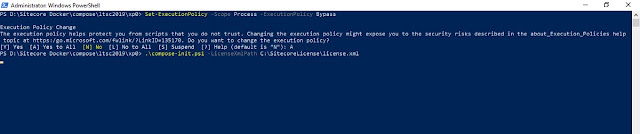
11. Now run Windows PowerShell as an admin at the path \compose\ltsc2019\xp0. Now execute the below command.
.\compose-init.ps1 -LicenseXmlPath C:\SitecoreLicense\license.xmlNote that the C:\SitecoreLicense\license.xml is the path where the Sitecore license file is located.

12. Once the above command is completed now it's time to pull the Sitecore Docker images. Run the below command to pull the Sitecore images.
docker-compose pull
Note that pulling up the images takes some time.
13. Now when the pulling is complete then run the below command to make the containers up and running.
docker-compose up --d
14. Once the docker images are up then open any browser and navigate to the page https://xp0cm.localhost/. It is the default Sitecore home page.

15. Open any browser and navigate to https://xp0cm.localhost/sitecore. It is the login page for Sitecore. You can log in it with the user as admin and password as Password12345. Remember the password is set up in the 9th Step.

16. Now open any browser and go to http://localhost:8987/solr. It will open the Solr dashboard.

17. To open the Microsoft SQL Server. Open SSMS (Microsoft SQL Server Management Studio) on your desktop and enter Server name as localhost, 14330.

18. Now it is recommended by Sitecore to build the indexes.
To rebuild the search indexes:
1. Go to the Sitecore Launchpad and open the Control Panel
2. Now in the Indexing section select Populate Solr Managed Schema
3. In the Schema Populate dialog box, click Select All and then click Populate
4. Wait for the process to finish
5. Now on the Control Panel in the Indexing section select Indexing Manager
6. In the Indexing Manager dialog box, click Select All and then click Rebuild
Some commands necessary to work with Sitecore on Docker
1. For Cleaning or Removing the Sitecore instance on Docker run the following command.
Run Windows PowerShell as an admin at the path \compose\ltsc2019\xp0. Now execute the below command.
docker-compose down
2. For Stopping Sitecore instance without losing the changes run the following command.
Run Windows PowerShell as an admin at the path \compose\ltsc2019\xp0. Now execute the below command.
docker-compose stop
Now to start back the Sitecore instance run the below command.
docker-compose start
Important Links
Sitecore Download Site - https://dev.sitecore.net/Downloads.aspx
Sitecore Docker Documentation - https://doc.sitecore.com/xp/en/developers/102/developer-tools/containers-in-sitecore-development.html
Docker Desktop - https://www.docker.com/products/docker-desktop
References
Containers in Sitecore development - https://doc.sitecore.com/xp/en/developers/101/developer-tools/containers-in-sitecore-development.html
Sitecore Docker - https://www.altudo.co/resources/blogs/sitecore-docker
Sitecore Installation Docker way - https://buoctrenmay.com/2021/01/07/sitecore-xp-10-0-update-1-installation-docker-way/
Happy Coding, Coders for Life 😎
Thanks.. appreciated
ReplyDeleteThank you......
DeleteGood Work! All steps are clear and to the point.
ReplyDeleteThank you......
DeleteNicely explained, Crisp and Clear
ReplyDeleteThank you......
Delete