

Today, I am going to explain the process of installing and configuring Sitecore Stream on the Sitecore XP or XM platform.
In today’s fast-moving digital marketing world, marketers have to work around the clock and are expected to create personalized brand experiences across many different touchpoints and deliver them seamlessly and smoothly. To solve this pain point, Sitecore comes with Sitecore Stream, which helps make this easier by adding and enabling AI-powered tools directly into Sitecore XP. It is designed to boost content creation, improve workflow, and keep your brand strong and consistent.

What is Sitecore Stream?
Sitecore Stream brings AI capabilities to Sitecore products, changing the way marketers create and manage content. Built on Microsoft Azure OpenAI Service, it uses advanced large language models (LLMs) to help teams ideate, craft, and refine on-brand content quickly and securely. Stream simplifies everyday marketing tasks like content creation, campaign development, and message personalization. It supports work across multiple brands and complex campaigns while keeping teams organized and on schedule. With an AI-first approach, it captures your brand’s voice and enhances daily workflows, helping marketing teams boost efficiency, improve collaboration, and deliver consistent, high-quality customer experiences across all channels.
Prerequisites
Before proceeding with the installation of the module, ensure the following:
1. Active Sitecore Stream License - Contact your Sitecore Account Manager to obtain a license.
2. Sitecore XP Version - Ensure you are running Sitecore XP version 10.2 or a later version.
3. Administrative Access - You must have administrative rights for your Sitecore instance.
4. Sitecore Cloud Portal Access - Necessary for downloading the module and managing the required credentials.
Step-by-Step Installation and Configuration
1. Download and Install the Sitecore Stream Module
Step 1: Log in to the Sitecore Cloud Portal: Navigate to the Sitecore Cloud Portal and log in with your credentials.
Step 2: Select your organization: If you are associated with multiple organizations, choose the one linked with your Sitecore Stream license.
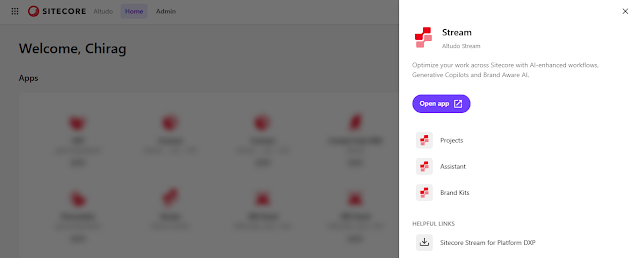
Step 3: Access the Stream Application: On the homepage, locate the Apps section and click on the Stream application.

Step 4: Download the Installation Package: On the Sitecore Cloud Portal homepage, in the Apps section, click the Stream application, then in the right-hand pane, download the Sitecore Stream for Platform DXP installation package. The zip file includes the package and the documentation.
Step 5: Install the Package: In Sitecore Launchpad, navigate to Control Panel > Administration > Install a package. Alternatively, from the Sitecore Desktop click Start Menu > Development Tools > Installation Wizard. Follow the prompts to complete the installation.
Note: Alternatively, you can also download the Sitecore Stream package from the Sitecore Developer website.
2. Generate Client Credentials
To authenticate Sitecore Stream and configure the connection string, you must create a new client to generate the “client_ID” and the “client_secret”.
Step 1: Access the Stream Application: In the Sitecore Cloud Portal, click on the Stream application and then select Open app.
Step 2: Navigate to Admin Section: In the Stream top navigation menu, click on Admin.

Step 3: Create New Credential: On the Credential page, click on Create credential. In the Label field, enter a suitable name for the client. In the Description field (optional), enter a description. Click Create.

Step 4: Save Credentials: Copy and securely store the generated client_ID and client_secret.
Note that the client_secret is displayed only once and cannot be retrieved later.
3. Update Connection Strings
Configure the connection strings to enable communication between the Sitecore XP or XM platform and Sitecore Stream.
Step 1: Open Configuration File: Navigate to C:\inetpub\wwwroot\[Sitecore_CM]\App_Config\ConnectionStrings.config.
Step 2: Add Connection String: Insert the following line before the closing </connectionStrings> tag.
<add name="sitecore.aiclient.stream" connectionString="client_id=YOUR_CLIENT_ID;client_secret=YOUR_CLIENT_SECRET;authority=https://auth.sitecorecloud.io;audience=https://api.sitecorecloud.io" />Note: Replace YOUR_CLIENT_ID and YOUR_CLIENT_SECRET with the values obtained earlier.

4. Configure Brand Kit Integration (Optional)
Before you can use a brand kit on the Sitecore DXP platform, your organization must first create a brand kit in Sitecore Stream. I will explain the process of creating a brand kit in my other blog.
Sitecore Stream references the brand kit and draws on the information in the Brand Context, Do's and Don'ts, and Tone of Voice sections to guide content generation that reflects your brand.
If you are using the Sitecore Stream DXP module version 1.0, then you need to follow the steps below to configure a brand kit. For later versions, you can directly select the brand kit from the Stream dialog, as shown in the screenshot below.

Step 1: Get the organization ID from the URL: Log in to Sitecore Cloud Portal. If you belong to multiple organizations, select the one that contains Sitecore Stream. If you have already logged in, switch to the appropriate organization. Now, from the URL, get the organization ID. For example: https://portal.sitecorecloud.io/?organization=org_ABCDef123456. The organization ID is what comes after organization=.
Step 2: Get the Stream Brand Kit ID from the URL: Open the Stream app, go to Brand Kits, and select your desired brand kit. Then, get the brand kit ID from the URL. For example: https://stream.sitecorecloud.io/brandkits/a1234bcd-efg5-678h-910i-jklmnopqrstu The brand kit ID is what comes after /brandkits/.

Step 3: Open Configuration File: Navigate to
C:\inetpub\wwwroot\[ Sitecore_CM] \App_Config\Sitecore\AiClient\Sitecore.AiClient.config.
Step 4: Update the following settings: Update the below settings by replacing YOUR_ORG_ID and YOUR_BRANDKIT_ID with your actual values.
<setting name="Sitecore.AiClient.Stream.BrandKitId" value="YOUR_BRANDKIT_ID" />
<setting name="Sitecore.AiClient.Stream.BrandKitReferencePath" value="/api/brands/v1/organizations/YOUR_ORG_ID/brandkits/YOUR_BRANDKIT_ID/references" />
5. Verify the Installation and Configuration
Ensure that Sitecore Stream is correctly installed and configured by following the steps mentioned below.
Step 1: Access Sitecore Launchpad: Log in to your Sitecore instance and open the Launchpad.
Step 2: Check for Stream Module: Verify the presence of the Stream module in the Launchpad.

Step 3: Test AI Capabilities: Create or edit content to test AI-assisted features, ensuring they function as expected and align with your brand guidelines.

These are all the steps you have to follow to install and configure Sitecore XM or XP with Sitecore Stream. Once installed, Sitecore Stream offers a suite of tools to enhance your marketing efforts:
Projects: Centralized workspace to manage project details, deliverables, milestones, and tasks.
Brand Assistant: Interact with a brand-specific AI assistant to generate on-brand content and answer brand-related queries.
Content Generation: Use AI to create, summarize, or refine content across various text fields, ensuring consistency and quality.
These features empower marketing teams to work more efficiently, maintain brand integrity, and deliver personalized experiences at scale.
References
Install and configure Sitecore Stream for Platform DXP - https://doc.sitecore.com/xp/en/users/latest/sitecore-experience-platform/install-and-configure-sitecore-stream-for-platform-dxp.html
That’s All for Today,
Happy Coding,
Coders for Life